How “Cheap and Easy” Dominates the Workplace

It’s a tragic fact, rarely are we taught the fundamental purpose of our roles and goals in business, but we all share a single purpose regardless of the kind of work we actually do.

“Our purpose is to not just achieve our goals, our purpose is to also figure out how to do it cheap and easy.”

Luckily, I caught on about 4 years into my engineering career and when I finally started solving problems that were cheap and easy to make, I quickly learned I could save my employer’s more than I was paid.

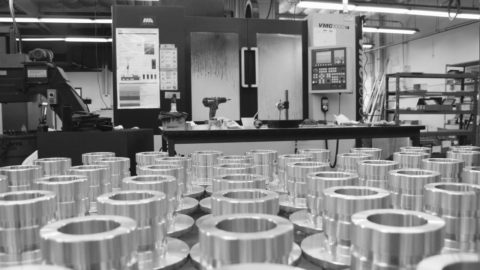
Back then it was the late 90’s and the fancy acronym wasn’t really on anyone’s radar or talked about. DFM (Design For Manufacturability) is loosely thrown around these days to sound important, yet very few unfold its golden wrapping paper.

I learned that if I found ways to save 5 minutes of run-time with my designs, in high enough volume it could be significant savings. For example, 5 minutes per part, for 1200 parts, at $75/hour, yields $7,500 of savings.

Here at Parametric, I only wish one of my machinists would come to me and say, “Hey man, I decided to make this custom fixture, we are going to save 5 minutes of run-time per part, so that’s $7,500 on this order!”

Booya…I love you employee. Do you want more money? Time off? Let’s figure out a way to make it work.  Whatever it takes, let’s do it so you continue raising my bottom line.

Employers want employees that create value while solving their problems and achieving their goals. We do that by figuring out a way to do it cheap and easy.

***

I’ve been a licensed professional mechanical engineer since 1998 and I never had anyone teach me how to engineer parts that are cheap and easy to make.   It has and continues to be a, “Learn as you go” process.  Sure, I had a couple of mentors teach me some basics, but the people who actually make the parts have taught me everything.

I remember the first time Jon Drury (CEO of Parametric Manufacturing) and I started working together back in 1999.  I was a hot-shot, young ME at JDSUniphase who just started using Solidworks 98.

My mind was blown.  I went from the painful insanity of 2D/3Dish trim and extend lines to full-blown 3D parametric bliss. I literally became an 8-year-old kid running around in ecstatic joy designing whatever I could imagine and I was designing cool stuff for lasers!

I discovered how to be a self-proclaimed designer guru, demanding extreme tolerances because now I was working with lasers; I’m supposed to have tight tolerances. Unfortunately, this was the elusive obvious, evil root-cause of so many redesigns.

When I sent Jon my first Solidworks design for a quote, what I got in return was, “Hey Ryan, this is Jon at Machine Mastery…So, I’m looking at this starship-enterprise-thinga-ma-jiggy? Ho Ho, ha ha…There’s some cool features, but they’re impossible to machine buddy…”

I was a legend in my own mind.

From that point forward, the real education process started and it wasn’t all rainbows and unicorns.

I lived up to many of the engineering stereotypes (close-minded, I had to be right all the time, couldn’t handle criticism without becoming emotional and abrasive).  It took another 5 years of courage, self-help, and commitment to remedy those ailments and I believe these internal, personal battles are why so many of us resist DFM.

You see, if we change our minds for a better result, it implies we were wrong!  Let go and do whatever makes the most sense regardless of where the idea came from.  On top of becoming a more enjoyable person to work with, the rewards can be substantial.

You can dominate in the workplace by improving your employer’s bottom line, and if you are vocal about it (in a cool way), you might just double your salary.

Because the sweet reward for learning DFM and then revising my designs came when I created visibility of what I learned and the $$$$$ saved.   From there, I negotiated privileges for my new found value. These were the early years of 2000-2004.  Nobody worked from home then. I did.  Leave on a Wednesday to snowboard in Tahoe? Yump. 5 days to race motorcycles in Utah? No problem.

Employers want employees that create value while solving problems by raising their bottom line.

***

It’s actually not that hard to do.  You don’t have to go to school or take a class.  Send a design out for a quote and ask the vendor to offer design suggestions for price reduction and faster delivery. Better yet, visit them and have a face to face so you can practice communication skills and truly learn how stuff is made.

Start a spreadsheet to track every quote.  As much as it may pain you, let-go and implement the suggestions, most likely they will lead to other ideas that will further save cost and time. Do this early in development when its easier to make changes.

Ask the vendor to quote it again, track the cost differences and oh-boy, you have just measured and documented yourself creating added value with dollar signs attached to it.

“Cheap and Easy” also yields improved assembly and functional performance.  Projects start finishing on-time more often. Last-minute design revisions start to evaporate and your status in the workplace becomes bullish.

The blessing in disguise is the new mindset of letting go, becoming a good listener, being open-minded, receiving criticism constructively, creating value, standing up for yourself and asking for what you deserve!

Whether you are a project manager, engineer or maybe the CTO of your company…Remember, we all share a single purpose regardless of the kind of work we actually do. Our purpose is to not just do our jobs, our purpose is to figure out how to do it cheap and easy.

Good Luck!

The #1 Killer to a Low Price CNC Machined Part

Low Price CNC Machined Parts Never have smooth round edges

The photo below is a classic example of CNC Public Enemy #1. Smooth round edges or external radii can cause a design to shoot up in price by as much as 5X in worst case scenarios.

top killer to low price cnc machined part

Why? Because the CNC machine has to trace edges and paths multiple times, and that creates an enormous amount of time you end up paying for unnecessarily.

I know, a smooth round edge is an oxymoron, but how else to describe it? Where there should be an edge, a radial surface exists. When we receive RFQs for designs with external radii on all the edges, we’re quickly disappointed. It will be next to impossible to offer a low price for a simple part that should be easy to make.

Product design is an art intertwined with engineering and manufacturing knowledge. Adding edge radii purely for cosmetic reasons is a mistake; that fillet feature in your CAD software should be used for functional purposes only.

Designing for the Production Process Upfront is Dangerous

When a part is destined for Plastic Injection Molding, Die-Cast, and Zinc-Cast, we can fall into an expensive edge radii design trap.

DFM Axiom 3: DFM (Design For Manufacturability) is dependent upon which phase of the project you are in. The statistical probability of your initial design hitting production is very, very low. If the end process is plastic injection molding, spending the time and effort to design for it upfront is a waste when producing conceptual and functional prototypes and the features like edge radii, drafts and other’s drive the cost of the prototype up 2-3x unnecessarily.

Here’s a helpful hint: Use configurations in your CAD package to assist. In Solidworks, it’s easy to create multiple configurations for each process. One configuration is for CNC and employs chamfers and edges. Another configuration is used for the plastic injection molding or 3d printing, employs corner radii everywhere, drafts, thinner walls, and snap fits. Another configuration optimized for production is mandatory; configurations are such a blessing, try it.

What are the General Design Rules for Adding Radii to Edges?

If handling and safety is the concern, consider chamfers and ask yourself, “Where am I in the development process? Are we making 5 prototypes and it’s in the noise? or Are these prototypes for investors and they have to be the best ever? or Are these 200 pre-production parts and I need the lowest price I can find?”

Answers to these questions are the guide to creating edge radii for cosmetic reasons or not. But really one should do everything they can not to include them because it adds so much cost and time.

  1. The best alternative is to leave a deburred edge.
  2. The second-best alternative is to make a chamfer.
  3. And last but not least, if you decide to sin, and add a radius to your edges, at least make them all the same size and on a flat plane; no 3D tracing of edges.

Chamfers and 3D Tracing

We will use common radii or chamfer tools to trace the edge. However, if it is not on a single plane, then costs rise logarithmically as we will need to 3D profile it. Look at the part below. Though it looks great on the screen, it is a nightmare and 5X more expensive to machine; please don’t design parts that look like Star Wars Tie-Fighters.

Example of Costs vs. Corner radii

This part here was originally submitted with external corner radii to break the sharp edges. In quantities of 100, $375 each, $235 with chamfers, and with edges, an appealing $170 ea. That’s $17,000 in savings you could show your boss.

Expensive: $375 ea. Qty.100, 4140 Steel

Expensive External Corner Radii on perimeter edges front and back: $375 ea. Qty. 100 & 4140 Steel

Cheaper: $205 ea. Qty.100, 4140 Steel

Cheaper Chamfers on perimeter edges front and back: $235 ea. Qty.100 & 4140 Steel

  • Ignoring the spline, this part is very cheap and easy to make with neither corner radii or chamfers. The first two ops are turned on a CNC lathe very quickly for the front/back profiles, bores, and spline; easy breezy. Then the third op cuts the profile and adds the countersinks. Done. It’s a $170 part at quantities of 100.
  • But to add chamfers or radii, it requires additional ops to run the profiles of the edges for both the top and bottom sides. So an extra operation is added to flip the part over, plus the time to trace the edges with a chamfer tool. The run time to chamfer isn’t that bad and can be done quickly with the right-sized tool, so it’s a $65 adder per part.
  • External Radii? Turns this part into a financial disaster at $375. All the corner radii will have to be 3D interpolated with a ball end mill and that will take forever to achieve a nice finish that doesn’t require extra man-hours of hand finishing.

How do edge radii affect the CNC process?

  • Edge radii require the tool path to trace every edge with a special tool multiple times; runtime skyrockets and machine shops charge by the hour.
  • It’s all about time to make the part. There is an extra tool change that increases set-up time and run-time.
    • If there are 1.5mm, 3mm, and a 5 mm radii to blend all the corners, then it’s triple the cost of tools and the time for tool changes.
  • Often times, these tools don’t fit in tight spaces, so it may be impossible to achieve the external radius and now you have to go back and redesign your part for the process.
  • Edge radii CNC tools only work best when tracing in a flat plane.

In summary, the phase of development dictates the process of manufacturing and whether to add external radii or not. Try to use chamfers if a sharp edge isn’t desired first and eliminate them if you can get away with it. And lastly, make sure you show your superior of your wise DFM decisions and track the savings. Quantify your value and share. Employers are looking for value in their employees, this is a way to show it with some actual large dollar signs attached to it!